
MAGNUS.TOWN
:
Developing my own light meter tool
08 April, 2025
Check out the tool here!
All the other tools are dumb and hard
We all know light meters are essential photography tools. Placing specific tones, like important shadows or highlights, onto desired zones requires deliberate metering (Great blogpost on the topic btw!). Dedicated spot meters are fantastic but aren't always handy and expensive. So, the question arose: Can i make a tool/lightmeter in the browser, just using JavaScript, that can help me meter scenes?
That's the idea behind the tool we've (Me and Gemini AI) been developing. It's not a replacement for a calibrated Sekonic, but it is an interactive way to apply Zone System principles, and visualise it! Let's break down how it works and the thinking behind it. First of all - it all runs in client side JS. No data is sent anywhere! You can verify this in your browser's developer tools if you like.
How it works:
The core challenge is that webcams and phone cameras automatically adjust light, making their light readings relative and inconsistent. The tool tackles this in two ways:
Mode 1: Live Camera + Manual EV (the worse one)
- This mode uses your device's live camera feed.
- Since the tool can't know the absolute brightness, you provide a baseline by selecting the Lighting Condition from the dropdown. This list uses standard Exposure Values (EV) for common light scenarios (from wikipedia). Choosing the condition that best matches your scene sets the Base EV assumption for the tool's calculations. This user input is crucial for getting plausible results in this mode.
Mode 2: Upload Image + EXIF Data (the better one)
- This mode avoids the webcam's auto-exposure issues by using a photo you've already taken (JPG or HEIC).
- The tool reads the image's EXIF metadata to find the Aperture, Shutter Speed, and ISO used for that shot.
- From these known settings, it calculates a reliable Base EV for the lighting conditions when that photo was taken. This calculated EV is displayed and used as the baseline.
Primary Tone Placement (The Key Measurement)
In both modes, the first click you make on the canvas image is the most important one. It tells the tool which tone you want to place deliberately onto a specific Zone, based on the film type you selected:
Negative Film: You typically want to ensure detail in your important shadows. Select "Negative" mode and click on the darkest area where you need to see texture and detail (ansel adams zone system). This isn't pure black, but can be dark fabric, deep foliage in shadow, or dark hair. By clicking here, you tell the tool "Place this tone on Zone III". Zone III is generally considered the lowest zone that holds significant detail in a traditional negative print. This calculation aims to prevent your important shadows from becoming featureless black.
Positive (Slide) Film: You typically want to ensure detail in your important highlights, as slides have less latitude. Select "Positive" mode and click on the brightest area where you still need to see texture and detail. This isn't a specular highlight or direct sun reflection, but bright clouds, sunlit white clothing, or detailed snow. By clicking here, you tell the tool "Place this tone on Zone VII". Zone VII represents the brightest end of the scale that typically retains good texture on slide film. This calculation aims to prevent your important highlights from blowing out to pure white.
The shutter speed is always calculated based on the primary measurement (zone III for negative, VII for positive), relative to the determined Base EV (from dropdown or EXIF) and your chosen ISO/Aperture settings.
The second click simply shows where another tone (e.g., a highlight if you measured shadows first) falls on the Zone scale given the exposure determined by the primary reading. It helps visualize the scene's contrast range. You can then use the + / - buttons to manually adjust the exposure in full stops, overriding the initial calculation if you decide the measured tone should fall on a different zone.
My workflow:
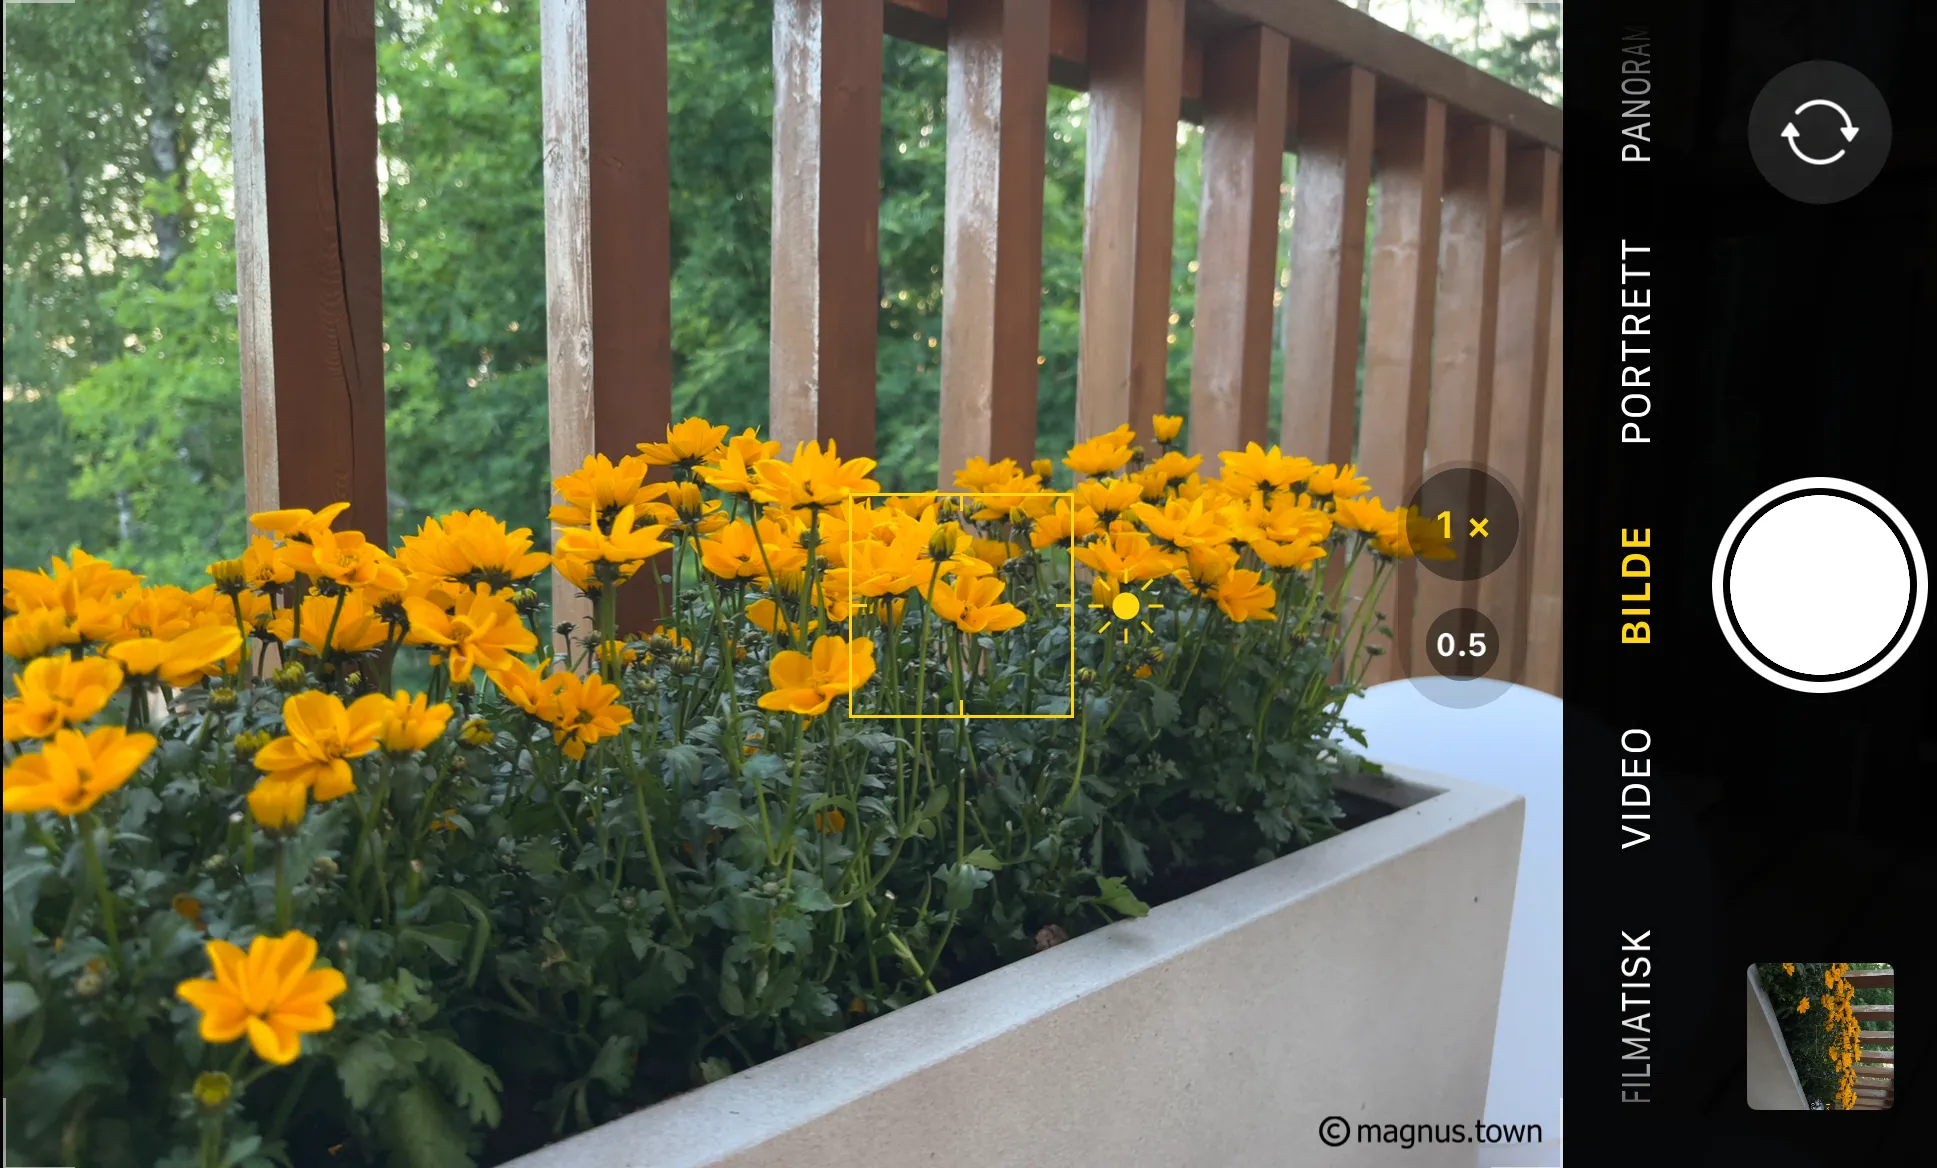
When I'm looking to meter a scene accurately, which is typically the case when I'm shooting with my medium format camera, I start by using my iPhone to get an approximate idea of the light in the scene.
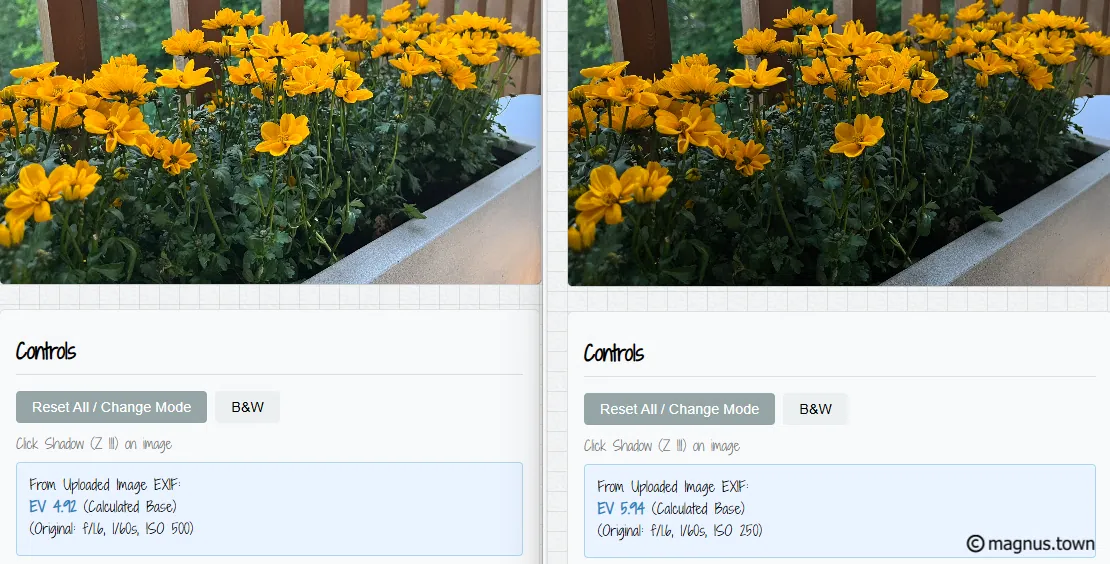
In photo mode on my iPhone, I can adjust the brightness of the scene by sliding my finger up or down. I often find that the iPhone tends to overexpose images slightly. The images below illustrate this, showing some flowers on my balcony in auto mode versus with the exposure adjusted darker. The auto-mode shot appears too bright for this time of day, and darkening the scene with the slider significantly improves the look.

Uploading this adjusted image to my metering tool reveals that, behind the scenes, the iPhone achieved the darker exposure by lowering the ISO from 500 to 250.
Continuing with the darker image, I input the primary and secondary measurement into my tool. By setting the ISO to 100 and the aperture to f/8, the tool calculates a shutter speed of one second.
This is the shutter speed I then use for my shot. Occasionally, I also utilize the +/- button to adjust the exposure. All these adjustments are conveniently handled within a single tool!
With exposure times above one second I use the "Reciprocity Plus" app on my iPhone to account for reciprocity.
After shooting analog for a while, I can usually look outside and get a generally good feeling about which shutter speeds to use. However, if I'm shooting street photography or in a city where scenes appear and disappear quite quickly, I'll simply meter a typical scene at the beginning of my hike.
Filters
If you are using graduated ND filters, you can still meter with this tool. You only have to keep in mind how the filter affects the scene. Reverse grad nd filters are darkest in the middle and fade towards the top and are great for sunsets, because the darken the brightest part of the scene. If a tone you are metering is under the filter, just increase the exposure using the + button, by 2 - 3 stops for a 0.9 RGND. If your measured area is under a soft grad nd filter only add 1-2 stops depending on how much of it is covered. This is because the tone you clicked is darker than it would be without the filter so you need to add exposure to place it correctly (slide film). The key is knowing whether the tone you clicked is affected by the filter.
Example with negative film:
upload image and click on shadow foreground (sone 3) and clouds (sone x) which is too bright...
since the clouds are under the filter, and will be darkened
no need to adjust the shadow exposure, the filter brought the highlights down
shoot with the suggested exposure
however, if the brighest tone of the image is darker than the latitude of the film, increase the exposure and keep in mind that the film would darken it by 2-3 stops.
Example with positive film:
- upload image and click on clouds (sone 7)
- since the clouds are under the filter they will be darkened by 3 stops.
- you need to increase exposure to compensate (e.g. 2-3 stops depending on the filter)
- shoot with the suggested exposure